So 3D Printers. Yeah. If you’re confused right now then read this.
I recently got really excited about 3D printing and decided that I wanted to have a 3D Printer, and now I do. I got the Printrbot Jr. (v2). It came in the mail today and I unpacked it only to find that it was perplexingly hard to put into its ready-to-print state, and, on the entire internet, there were no unboxing videos or instructions on how to set it up. This post will serve as an unboxing guide for confused Printrbot owners (I hope).
This is what the 3D Printer looks like right when you take it out of the box:
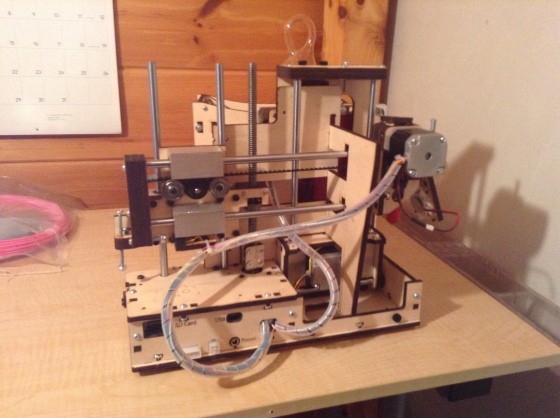
This is how it should look when it’s ready to print:
 The print bed (the flat red part) needs to be folded down (towards the camera in the first picture). In order to do this, the two wooden support pieces that hold the Printer in place during shipping must be removed. They are locked in tightly and it’s a confusing process to get them out. First, you’ll need to cut all the zip ties (not pictured) that hold the two wooden pieces on to the printer. DO NOT cut any zip ties that have been trimmed down by the manufacturers (like the ones holding the bunches of wires together), and do not have their long tail piece. These are permanent and should not be cut.
One of the two support pieces has holes for the metal rods that go through it. You need to get this piece loose in order to fold down the bed. The piece can slide up and down, but even when it is up as far up as it can go, the bottom of the piece is locked in place by the frame of the bed assembly (the part that sits on the ground).
To fix this, find this nut (it’s at the bottom of the threaded vertical rod):
 This is the mechanism that raises and lowers the whole extruder assembly. Turn the nut until it goes up enough for it to fit snugly in its place in the wood above. Then, turn the small round-cornered rectangle of wood at the bottom of the threaded rod clockwise for a few turns. This should raise the extruder assembly.
Once it is raised enough, you should be able to slide the wooden support piece up, detach it from the other support piece (this may take some brute force. Just do it carefully), and then wiggle them both free.
Ta-daaa!
But wait! The bed still wont fold down because the extruder is in the way!
To fix this, simply keep turning the threaded rod clockwise until the extruder assembly is as high as it can go. Then push it back so the extruder is out of the way.
But wait! The fan is still in the way!

*sigh* Pull the fan up and out of the way.
 The bed can now fold down, but will be tilted.
 Find these small, black screw things, and pull them out so that the bed assembly can be level. Then, put them back in, and screw them into the bed assembly to lock it in place.
You’re done! Now follow the setup instructions on printrbot.com and make sure to level your bed!
Now hope that your bot will work! Mine took days of troubleshooting and lurking around vague forums until we finally got it up and running. Also, I hope that the people at Printrbot will make setup instructions for the Jr. (v2).

